Crwl: A Bar Crawl Mobile App

I’ve always wanted to create a mobile app. However, I also always felt intimidated. 

In May of 2020, I decided to finally take on the challenge as an opportunity to illustrate my technical knowledge, design workflow, iterative process, and data-driven product management skills.

I designed and developed the application completely by myself with support from my OneMonth and SuperHi UX Design courses.

App Description: From local bars to hidden speakeasies, discover the story behind what makes these bars great as you tap into expertly brewed self-guided tours or choose to make your own bar crwl. 

In June of 2020, I launched the application in beta as a progressive web application (PWA) that users could add to their home screen. The development for Apple and Android devices is complete. However, I am still iterating through user testing and customer interviews. I plan to have the native mobile application available on the App Store and Google Play by October 2020.


Home Page
Self-Guided Tour Page
Location Screen
Google Maps API


Home Page
+/ - from "Your Crwl"
Sidebar
Key Word Search
Location Page

How to Download/View: 

You can view the application on your mobile device via this QR code. 

You can also view the entire application on this website.


.

Step 1: Conceive

My Google Doc of Questions

In this step, I worked to understand the needs and wants my product would solve. I also conducted customer interviews with past guests from my L.A. Historic Speakeasy Bar Crawl. I listened for problems, asked for feedback, and came up with and answered the following questions:

What Am I Trying to Solve? 

What if there was an easy way to plan a bar crawl or night out in a new city without spending hours on Google Maps, Yelp, and TripAdvisor? 

When you’re on vacation, nightlife should not exist in a vacuum, but rather as an extension of other ‘tourist activities.’ Your desire to learn about the history and discover the hidden gems of a city doesn’t magically turn off after 6 pm.

However, while working at a hotel in Downtown Los Angeles, I noticed the difficulties my guests experienced when it came to adding bars and speakeasies to their vacation itinerary. They were often able to find one or two bars to visit on Google or TripAdvisor. Still, there was often little information available on the history of the place. It was also particularly hard to find two or three well-regarded bars to visit that were within walking distance of each other. That is why I created my own tour company, L.A.’s Historic Speakeasy Bar Crawl. However, I wondered if there was a way to solve this problem for a greater number of tourists.

During customer interviews, those I interviewed wished there was an easy way to view a list of curated nearby bars and speakeasies, while also learning about the place and city at the same time – without having to pay for an expensive tour.

Who Am I Solving For?

My primary target users are “Cultural Explorers” – young adults (21 – 48) with disposable income that are visiting a city over 2+ hours from their homes. They likely stay in Airbnb’s or other short-term rental units over hotels. They also believe that experiencing the city is not limited to simply visiting tourism destinations (i.e., The Liberty Bell), but also drinking and eating with locals.


Step 2: Plan

In this step, I translated customer needs into a product idea. I also learned from competitors with similar solutions and looked for ways to improve on the existing competition. 

I used the newly focused idea of what needs my product addresses to determine the exact shape/functionality of the product I was going to build. I also set objectives and goals for the product. Also, I prioritized features for the Minimum Viable Product to ensure I could execute my ideas. 

What are the pain points of the current solution?

Without the help of a concierge or friend familiar with the city, planning a bar crawl or a night out in a strange town can be overwhelming.

Currently, to plan a visit to multiple bars, you must scour Yelp or TripAdvisor reviews to identify the best bars to visit. Then, you must plug them each into Google Maps to determine if they are close together or within walking distance.

There is no easy way to access a curated list of bars and nightlife destinations in a map view or a way to save bars/restaurants to create your own list.

What the customer needs or wants?

  • An easy way to plan a night out to noteworthy bars within walking distance of each other. 

The Product Solution

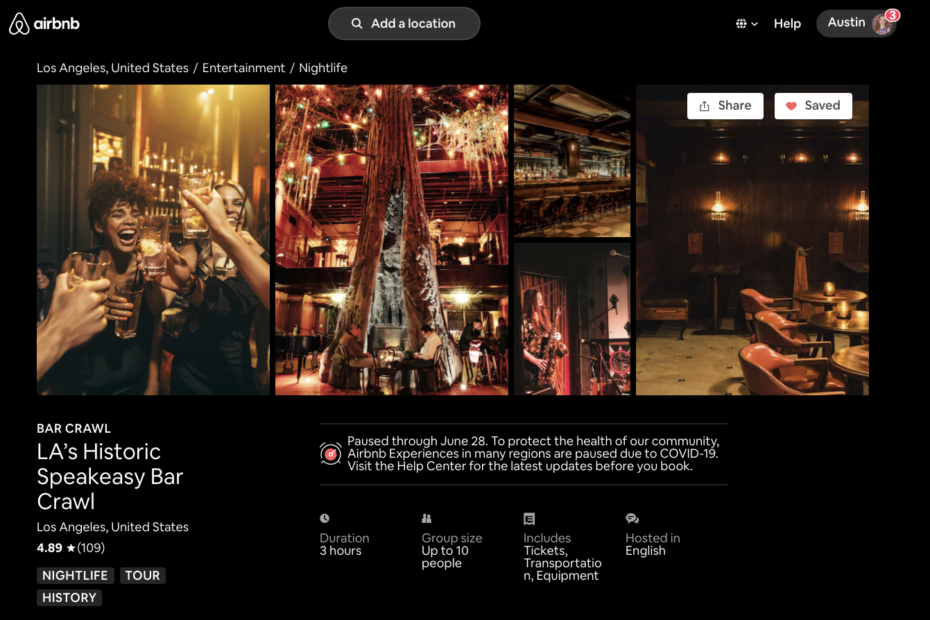
  • A smartphone app that lets you access prefabricated self-guided bar crawls and the opportunity to create your own from a curated list

The Product Value

  • Convenience, you don’t need to search on your own
  • Customizable, take a prefabricated tour or create your own
  • Detailed historical and insider information on each location that would be difficult to find otherwise

My objective:

To create a platform that will provide easy to follow self-guided historic bar crawl tours in major cities. I also wanted to allow people the opportunity to create their own bar crawl from a curated list.

What would success look like for this project?

Success means delivering an MVP, minimum viable product, which will take the form of a mobile application for a single city.

The MVP will provide highly detailed and validated knowledge about consumers of the application that will “test” our hypothesis. Our hypothesis is mainly that people want a mobile app that will allow them to easily discover bars and save them.

The insights gained from an MVP will be used in the future to plan the product roadmap. I will also continue to refine the product functionality and design through user research and feedback.

What are the features that should be prioritized?

To prioritize the development of the application’s features, I used the major value propositions (convenience, customizable, hard-to-find information) to determine the core critical features.

Critical and absolutely necessary features:
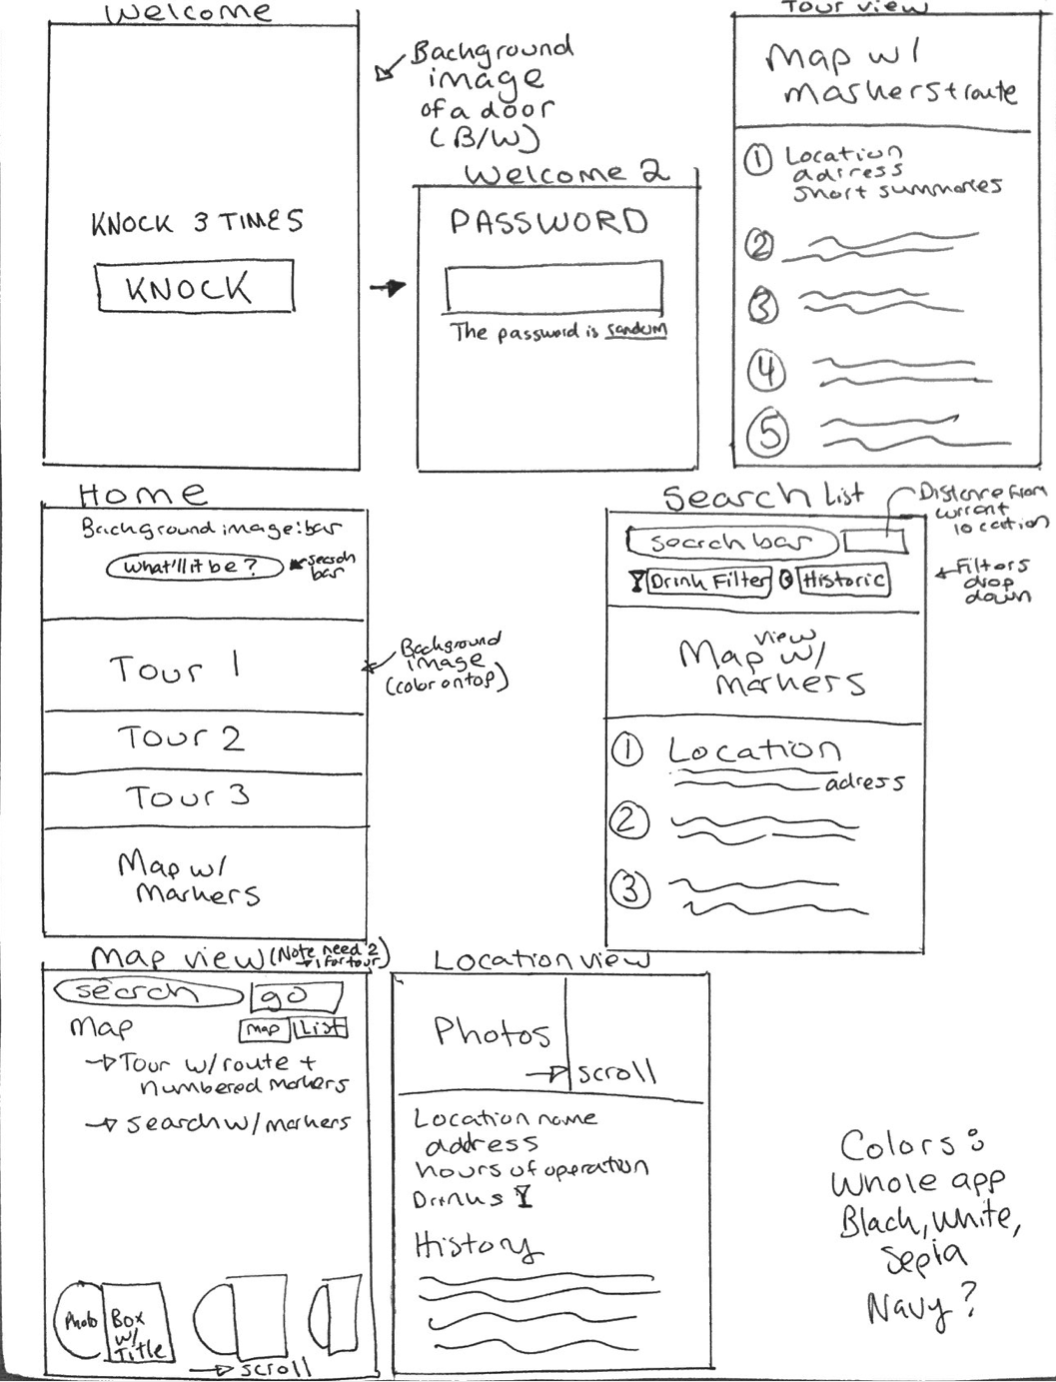
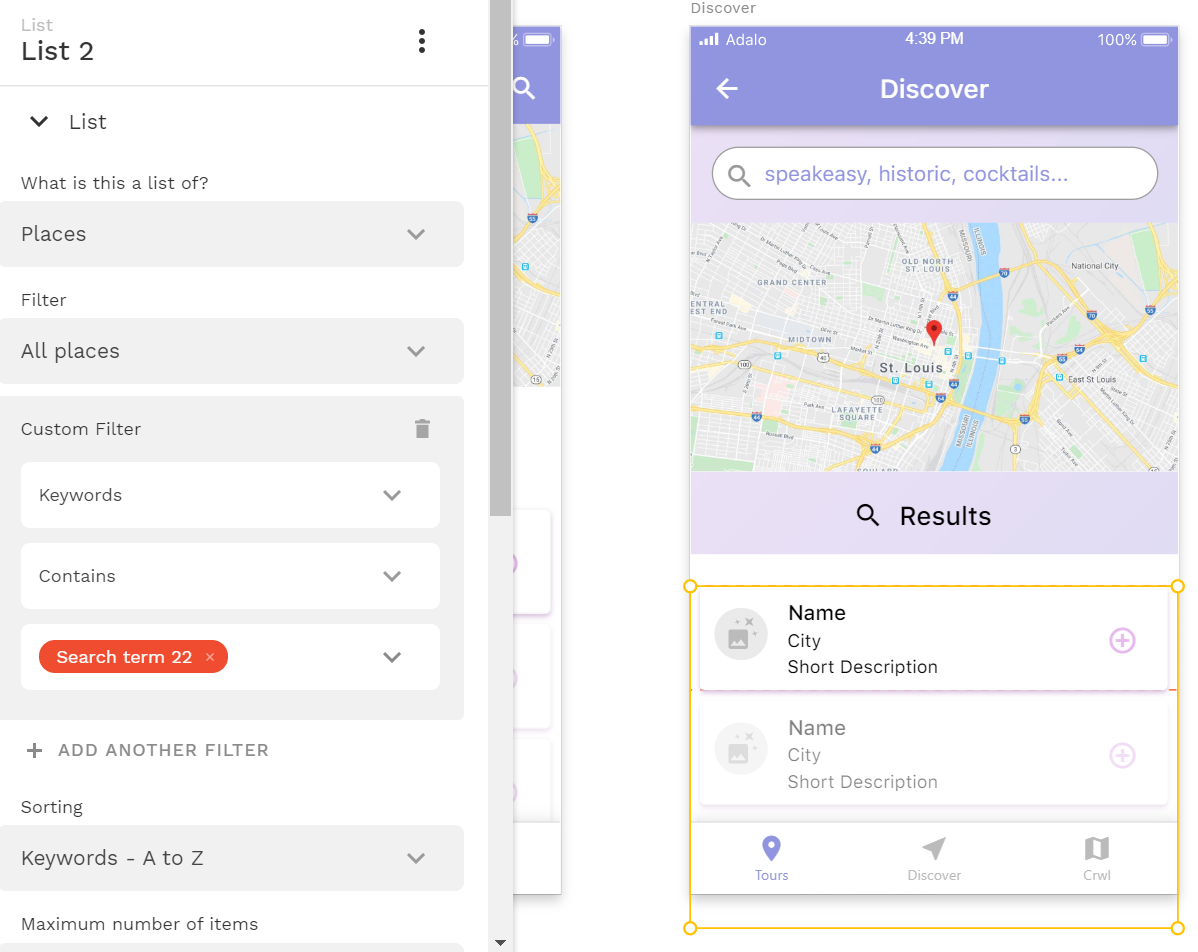
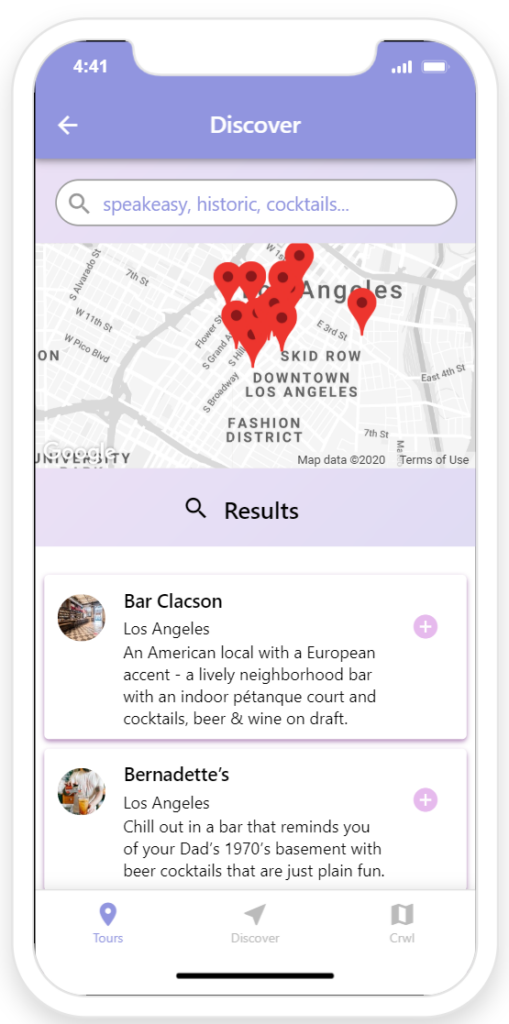
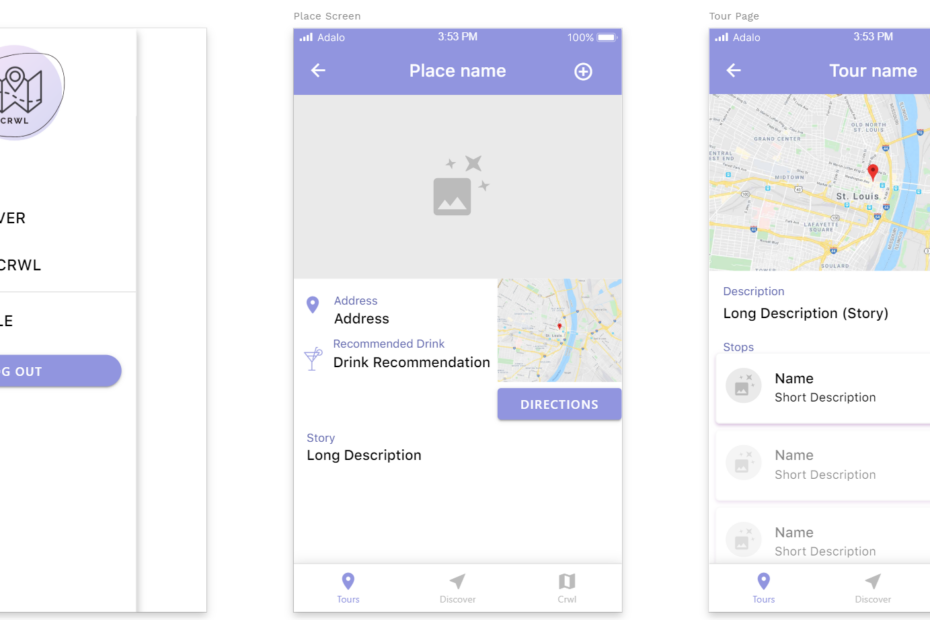
1. Map View of Recommended Places / Google Maps API
2. List View of Recommended Places
3. Location Page view with address and the “story” of the place (history, facts)
4. Tour View of a single prefabricated tour

Important, but not necessary for initial launch:
5. Login/ Signup
6. Ability to save places to your favorites (create your own crwl)
7. View and edit saved places / crwl
8. Search by key terms

Neat or cool, but not necessary for initial launch:
9. Button to open an address in Google Maps (navigatation functionality)
10. Select a city (and only view places and tours in that city)
11. Share your saved places or crwls with friends
12. Export your crwls as a Google Map with directions
13. Export your crwls as a social media square graphic/image
14. Discover other user’s popular crwls
15. User can add public or private notes to places


Step 3: Develop

During this stage, I started to execute my plan and actually began to build a mobile application.

Initial Sketch

I spent about 60 minutes just sketching out a few simple interfaces on pen and paper that would support the core functionalities and features. I landed on one that would put a map with markers indicating the recommended places as a core feature on almost every page. As much of the value of the application rested on easy discovery, I thought this provided a logical place to start.

User Flow Diagram

To ensure my wireframes and eventual development would be complete and cover every usage scenario, I outlined a user flow diagram on paper.  

Low Fidelity Wireframe
User Flow Diagram

Wireframe

I proceeded to incorporate my initial sketch ideas, and the user flow diagram into a low fidelity paper wireframe. Although I could have done so in Figma, I wanted the ability to quickly ideate as I would have on a whiteboard for a team project. I also was completing the development and UX design myself, which allowed me to leave the time-intensive skep of high fidelity wireframes.

Paper Prototype

Before building the application, I created a mini paper prototype to test my hypothesis about user flow. I tested the prototype with three friends and included their feedback for a sidebar to increase accessibility and ease of use in the final design.

UX Design

First, I determined a color scheme using Coolors. As the application targeted young adults, I wanted it to look modern, clean, and fun with plenty of white space and color. After all, it was an application intended to give you a great night out!

I also did extensive research on existing map-based mobile applications like Ruut, TripScout, OpenTable, Yelp, and Tripadvisor. I also viewed templates available on Behance and Figma to identify major components, blocks, and groups that would need to be created.

During this stage, I also settled on the name Crwl as there was no other application with the name in the App Store. I also felt it embodied the theme of fun and also addressed the problem the app was solving – the ability to create a bar crawl.

Development

I then build the application using Adalo. As Adalo focused on front-end development first with a similar interface to Figma and Sketch, I was able to build out the UX design of the application first.

With the initial design built, I was able to sketch out the databases I needed for the places, tours, and users. I then populated the information required for the final design and built out the backend database storage using Airtable. This was also when I wrote over 20,000 words of copy!

Once again, I pulled out my handy user flow diagram and refined the screen layout, actions, and added signup / log out functionalities.

Building the Search Functionality
Action Items
Database for Locations

 Step 4: Iterate

Live Design
Wireframe

Once I had a functioning application, I needed to figure out what’s working and what’s not. I continued to test I had built and got feedback from testing the application with 10 potential users.

As a result of their feedback, I added the Google Maps navigation functionality that was originally prioritized as unessential. Although they could see the map, users told me that the application wouldn’t allow them to copy and paste the address. They also would prefer to easily open up the address in Google Maps like they could when they accessed an address elsewhere and in other apps.

I also continued to refine the design of the application. I added a logo and switched up the application’s icons to better align with iOS and Android functionalities. For instance, in the initial version, the discover page had an icon often used as a location finder icon in iOS. In the next iteration, I changed the icon to a magnifying glass to better communicate search.

I also thought about how I could better communicate the brand’s lighthearted nature while giving the application a consistent feel. I decided to do away with the Stop Icons I had initially decided on, which were a rainbow of different colors. I instead designed icons that had a similar feel to the logo with different gradients in the same color scheme. The gradient motif was also added to the home page and to other areas in the application.


Step 5: Launch 

Est. October 2020

In June of 2020, I launched the application in beta as a progressive web application (PWA) that users could add to their home screen. The development for Apple and Android devices is complete. However, I am still iterating through user testing and customer interviews. I plan to have the native mobile application available on the App Store and Google Play by October 2020.

I am also developing a go-to-market marketing plan. Stay tuned!

How to Download/View: 

You can view the application on your mobile device via this QR code. 

You can also view the entire application on this website.


.